Understanding Clipsal single light switch wiring, aided by a diagram PDF, is crucial for safe and effective electrical installations within Australian homes and buildings․
Understanding the Basics of Electrical Wiring
Electrical wiring fundamentally relies on completing a circuit, allowing current to flow from a power source to a device and back․ A Clipsal single light switch wiring diagram PDF illustrates this, showing how wires connect to control the flow․ Key components include live (active) wires carrying voltage, neutral wires completing the circuit, and earth wires providing safety․
Understanding voltage, amperage, and wattage is vital․ Diagrams depict these connections, emphasizing safety through proper insulation and grounding․ Correct wiring prevents shocks and fires, while a PDF provides a visual guide for accurate installation and troubleshooting․
Safety Precautions Before Wiring
Prior to any wiring work, always disconnect the power supply at the circuit breaker․ A Clipsal single light switch wiring diagram PDF is a guide, not a substitute for safety․ Use a voltage tester to confirm the power is off․ Wear appropriate safety gear, including insulated gloves and eye protection․
Never work with wet hands or in damp conditions․ If unsure about any aspect of the wiring, consult a qualified electrician․ Incorrect wiring can lead to electric shock, fire hazards, and damage to appliances – the PDF won’t prevent this!

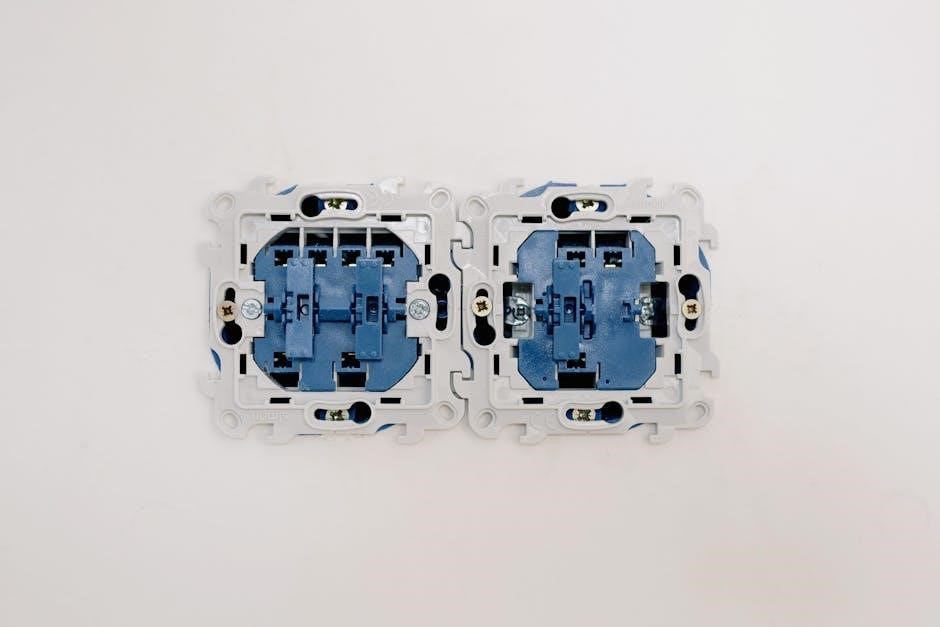
Types of Clipsal Single Light Switches
Clipsal offers various single light switches, including standard, dimmer, and indicator models; a diagram PDF helps identify wiring for each specific type․
Standard Single Pole Switch
The most common type, a standard single pole switch controls a light from one location․ A diagram PDF clearly illustrates its simple wiring: live wire connected to the common terminal, and the switched live wire to the active terminal․
Understanding the terminal markings on the diagram PDF is vital․ Correctly identifying the live, switched live, and earth connections ensures safe operation․ These switches interrupt the power supply to the light, offering basic on/off functionality․ Always consult a qualified electrician if unsure about any aspect of the wiring process, referencing the diagram PDF for guidance․
Dimmer Switches
Clipsal dimmer switches, as shown in a diagram PDF, allow adjustable light intensity․ Wiring differs from standard switches, often requiring a neutral connection alongside live and switched live wires․ The diagram PDF will detail specific terminal connections for various dimmer models․
Compatibility with bulb types (LED, halogen, incandescent) is crucial; the diagram PDF may specify compatible loads․ Incorrect wiring or incompatible bulbs can damage the dimmer or cause flickering․ Always verify the dimmer’s specifications and consult the diagram PDF before installation, and seek professional help if needed․
Switches with Indicator Lights
Clipsal switches featuring indicator lights, detailed in a diagram PDF, include an additional wire for the LED․ This wire typically connects to the live supply, powering the indicator when the switch is on or off, depending on the model․ The diagram PDF clearly illustrates this extra connection point․
Understanding the indicator light wiring is vital; incorrect connection can prevent illumination or cause the light to function improperly․ Always refer to the specific diagram PDF for your switch model, ensuring correct polarity and secure connections for reliable operation and safety․
Tools Required for Wiring
Essential tools, referenced in a diagram PDF, include screwdrivers, wire strippers, and a voltage tester for safe and accurate Clipsal switch installation․
Screwdrivers (Flathead & Phillips)
Both flathead and Phillips head screwdrivers are indispensable when working with Clipsal switches, as detailed in any comprehensive wiring diagram PDF․ These tools are used to securely fasten the switch to the wall mounting bracket and, crucially, to tighten the terminal screws that hold the wires in place․
Selecting the correct size screwdriver is vital to avoid damaging the screw heads, ensuring a firm connection․ A magnetic screwdriver can also be incredibly helpful for maneuvering screws in tight spaces, as often depicted within the diagram PDF illustrations․ Always inspect the screwdriver tips for wear before starting any electrical work․
Wire Strippers/Cutters
Essential for preparing electrical wires, wire strippers and cutters are fundamental tools when referencing a Clipsal single light switch wiring diagram PDF․ They precisely remove insulation from the wires without nicking the conductor, ensuring a safe and reliable connection․
Correct stripping length is crucial, as indicated in the diagram PDF, to prevent shorts or loose connections․ Cutters are used to trim wires to the appropriate length for neat and tidy installations within the switch enclosure․ Investing in a quality tool simplifies the process and enhances safety․
Voltage Tester
A non-negotiable safety tool, a voltage tester verifies the absence of electricity before commencing any wiring work, guided by a Clipsal single light switch wiring diagram PDF․ It confirms that the circuit is de-energized, preventing electric shock․
Always test wires individually, even after switching off the circuit breaker, as residual voltage can remain․ The diagram PDF won’t indicate live wires – the tester will! Proper use is paramount for personal safety and correct installation, ensuring a secure electrical connection;

Decoding a Clipsal Single Light Switch Wiring Diagram PDF
Mastering a Clipsal single light switch wiring diagram PDF requires identifying terminals, understanding symbols, and recognizing Australian wire color codes for safe installation․
Identifying Terminals: Live, Neutral, and Earth
A Clipsal wiring diagram PDF clearly labels terminals․ The Live terminal receives power from the circuit breaker, often marked ‘L’․ The Neutral terminal completes the circuit, typically designated ‘N’․ Crucially, the Earth terminal, usually green and yellow, provides a safety path for fault currents, marked with the earth symbol․
Correct identification is paramount; connecting wires incorrectly can cause short circuits or electric shock․ Diagrams often use color coding – brown for Live, blue for Neutral, and green/yellow for Earth – but always verify with the diagram itself․ Ignoring these distinctions poses significant safety risks, necessitating careful attention․
Understanding Switch Symbols
Clipsal wiring diagram PDFs utilize standardized symbols for clarity․ A single pole switch is represented by two terminals and a rocker symbol, indicating on/off functionality․ Dimmer switches have additional symbols denoting adjustment capabilities․ Understanding these visual cues is vital for interpreting the diagram correctly․
Pay attention to line representations: solid lines signify direct connections, while dashed lines may indicate switched live wires․ The earth symbol, a series of descending lines, denotes the grounding connection․ Familiarizing yourself with these symbols ensures accurate wiring and avoids misinterpretations, promoting safety․
Color Coding of Wires (Australian Standards)
Australian standards dictate specific wire colors for safety and identification within a Clipsal single light switch wiring diagram PDF․ The active or ‘live’ wire is typically red, while the neutral wire is black․ The earth wire is consistently green and yellow striped, providing a clear visual indicator․
Adhering to this color coding is paramount; incorrect wiring can lead to electrical hazards․ Diagrams will clearly illustrate these colors, and it’s crucial to verify them before making any connections․ Always double-check against the PDF and local regulations to ensure compliance and a safe installation․
Step-by-Step Wiring Guide: Standard Single Pole Switch
Following a Clipsal single light switch wiring diagram PDF, carefully connect wires to the terminals, ensuring secure connections for safe and reliable operation․
Connecting the Live Wire
Referencing your Clipsal single light switch wiring diagram PDF is paramount when connecting the live wire; typically red, but always verify with a voltage tester․ Isolate the power supply before commencing any work․ The live wire connects to the common terminal, often marked ‘L’ or ‘P’ on the switch․ Ensure a secure connection, using the appropriate screwdriver and terminal type․ Incorrect wiring can cause short circuits or electrical shock, so double-check against the diagram․ Proper insulation and secure fixing of the wire within the terminal are essential for safety and compliance with Australian standards․ Always prioritize safety and consult a qualified electrician if unsure․
Connecting the Switched Live Wire
Consulting your Clipsal single light switch wiring diagram PDF is vital for correctly connecting the switched live wire – usually black or blue․ This wire carries power from the switch to the light fixture․ Connect it to one of the remaining terminals on the switch, ensuring a firm and secure connection․ Verify the wire color coding aligns with Australian standards before connecting․ Incorrect connection can prevent the light from functioning or create a safety hazard․ Double-check against the diagram to confirm proper placement․ Secure the wire within the terminal block, and always isolate power before working․
Connecting the Earth Wire
Referencing your Clipsal single light switch wiring diagram PDF, the earth wire – typically green and yellow – is paramount for safety․ Connect this wire to the designated earth terminal on the switch, often marked with an earth symbol or colored green․ Ensure a secure connection, as it provides a path for fault current, preventing electric shock․ Never omit the earth wire connection․ Confirm the diagram’s instructions for proper grounding․ Proper earthing is a critical safety feature, protecting against electrical hazards․ Always verify the connection before restoring power․

Wiring a Clipsal Dimmer Switch
Consult the Clipsal dimmer switch wiring diagram PDF to correctly identify terminals and ensure compatibility with your chosen bulbs for optimal performance․
Compatibility with Different Bulb Types
Carefully review the Clipsal single light switch wiring diagram PDF to ascertain dimmer switch compatibility with various bulb types – incandescent, halogen, LED, and CFL․
LED compatibility is particularly crucial, as not all dimmers work effectively with LEDs; some may cause flickering or reduced dimming range․
The PDF will specify the wattage limitations for each bulb type, preventing overload and ensuring safe operation․
Always adhere to these guidelines to maximize dimmer functionality and extend bulb lifespan, avoiding potential damage or hazards․
Connecting the Dimmer Switch Terminals
Refer to the Clipsal single light switch wiring diagram PDF for precise terminal connections; typically, a dimmer has terminals for live, switched live, and neutral (if required)․
The PDF clearly illustrates which wire connects to each terminal, often color-coded for easy identification․
Ensure the live wire is disconnected from the power source before commencing any wiring․
Securely tighten all terminal screws to prevent loose connections, which can cause flickering or failure; double-check against the diagram․

Troubleshooting Common Wiring Issues
Utilizing a Clipsal single light switch wiring diagram PDF helps diagnose issues like non-functional switches, flickering lights, or tripped circuit breakers efficiently․
Switch Not Working
If a Clipsal single light switch fails to operate, consult the wiring diagram PDF first․ Verify the live wire connection at the switch terminal is secure and receiving power using a voltage tester – always isolate the circuit beforehand․
Check for loose connections or damaged wires within the switch body and at the light fixture․ Ensure the switched live wire is correctly connected to the light․ A faulty switch itself is also a possibility, requiring replacement․ Refer to the diagram to confirm correct wiring before attempting any repairs․
Flickering Lights
If lights connected to a Clipsal switch flicker, examine the wiring diagram PDF for potential issues․ Loose wire connections at the switch, light fixture, or within the circuit are common causes; tighten them carefully after isolating power․ Incompatible dimmer switches with certain bulb types can also induce flickering – check compatibility․
A failing switch or a problematic neutral connection can contribute․ Consult the diagram to verify correct wiring and ensure all connections are secure․ If flickering persists, a qualified electrician should investigate further․
Tripping Circuit Breaker
A tripping circuit breaker when wiring a Clipsal switch, as detailed in the diagram PDF, usually indicates a short circuit or overload․ Immediately disconnect power and carefully review the wiring against the diagram, checking for any crossed wires or damaged insulation․
Ensure the total wattage of connected lights doesn’t exceed the breaker’s capacity․ A faulty switch can also cause tripping; replace it if suspected․ If the problem persists, consult a qualified electrician – do not attempt further repairs yourself․

Advanced Wiring Configurations
Complex setups, like two-way switching, require careful study of the Clipsal diagram PDF to ensure correct wiring and functionality for multiple control points․
Two-Way Switching (Intermediate Switch)
Two-way switching, utilizing an intermediate switch, allows controlling a single light fixture from two different locations – a common feature in hallways or stairwells․ A detailed Clipsal single light switch wiring diagram PDF is absolutely essential for correctly implementing this configuration․
The diagram will illustrate how the live wire connects to both switches, and the switched live wires from each switch connect to the light fixture․ Understanding the traveler wires – those connecting the two switches – is paramount․ Incorrect wiring can lead to malfunction or, more seriously, safety hazards․ Always consult a qualified electrician if unsure․
Connecting Multiple Lights from a Single Switch
Connecting multiple lights from a single switch requires careful planning and adherence to a Clipsal single light switch wiring diagram PDF․ This setup often involves wiring lights in parallel, ensuring each receives full voltage․ The diagram will clearly show how to connect the switched live wire from the switch to each light fixture individually․
It’s vital to consider the total wattage of all connected lights and ensure it doesn’t exceed the switch’s and circuit breaker’s capacity․ Incorrect wiring or overloading can cause the breaker to trip or create a fire hazard․ Professional assistance is recommended․

Resources for Clipsal Wiring Diagrams
Access a wealth of Clipsal single light switch wiring diagram PDFs through the official Clipsal website, online electrical forums, and authoritative safety resources․
Clipsal Website and Documentation
The official Clipsal website serves as a primary resource for authentic Clipsal single light switch wiring diagram PDFs and comprehensive product documentation․ Users can typically find detailed schematics, installation guides, and technical specifications for various switch models․
Navigating the site often requires knowing the specific product code or series of the switch in question to locate the correct diagram․ Clipsal also provides downloadable catalogs and datasheets that may contain wiring information․
Ensure you are accessing the most current versions of the diagrams, as electrical standards and product designs can evolve over time, impacting wiring configurations․
Online Electrical Forums and Communities
Numerous online electrical forums and communities offer valuable insights and shared experiences regarding Clipsal single light switch wiring diagram PDFs․ These platforms often host discussions where members share diagrams, troubleshoot wiring issues, and provide practical advice․
However, it’s crucial to verify the accuracy of information obtained from these sources, as advice is often provided by non-professionals․
Always cross-reference forum findings with official Clipsal documentation or consult a qualified electrician to ensure safe and compliant wiring practices․
Electrical Safety Authority Websites
Australian Electrical Safety Authority (ESA) websites are invaluable resources for understanding safe wiring practices related to Clipsal single light switch wiring diagram PDFs․ These sites provide access to official safety standards, regulations, and guidance on electrical work․
They often feature detailed information on interpreting wiring diagrams, ensuring compliance, and avoiding common electrical hazards․
Always prioritize information from ESAs over unofficial sources, guaranteeing adherence to legal requirements and promoting electrical safety within your home․

Legal and Regulatory Considerations
Adhering to Australian electrical safety standards is paramount when utilizing a Clipsal single light switch wiring diagram PDF for any installation or repair work․
Australian Electrical Safety Standards
Navigating a Clipsal single light switch wiring diagram PDF requires strict adherence to Australian standards, AS/NZS 3000, often called the “Wiring Rules․” These regulations dictate safe installation practices, encompassing wire sizing, circuit protection, and earthing procedures․
Compliance ensures protection against electric shock and fire hazards․ Incorrect wiring, even following a diagram, can void insurance and lead to legal repercussions․ Always prioritize safety and verify the diagram aligns with current standards before commencing any electrical work․ Regular updates to these standards occur, so staying informed is vital․
Importance of Qualified Electricians
While a Clipsal single light switch wiring diagram PDF can seem straightforward, electrical work carries inherent risks․ A qualified electrician possesses the knowledge, skills, and licensing to interpret diagrams correctly and execute installations safely, adhering to Australian standards․
They understand complex wiring scenarios, perform thorough safety checks, and ensure compliance with regulations․ Attempting DIY electrical work without proper qualifications can lead to dangerous situations, void insurance, and potentially fatal consequences․ Always engage a licensed electrician for any electrical task․
Interpreting PDF Wiring Diagrams
A Clipsal single light switch wiring diagram PDF requires careful review; utilize zoom functions for clarity and note any revision dates for accuracy․
Zooming and Navigation within the PDF
Navigating a Clipsal single light switch wiring diagram PDF effectively demands understanding its features․ Most PDF viewers offer zoom capabilities – essential for deciphering intricate details of terminals and wire connections․ Utilize the scrollbars or page thumbnails for quick movement between sections of the diagram․
Furthermore, many PDFs include interactive elements like clickable links to related documentation or specific switch models․ Familiarize yourself with the PDF reader’s toolbar to access these features․ Consistent zooming and careful scrolling will ensure accurate interpretation of the wiring layout․
Understanding Diagram Revisions
Clipsal single light switch wiring diagram PDFs are occasionally updated to reflect changes in standards or product modifications․ Always check the document’s revision history, typically found in the footer or a dedicated section․ This indicates the date of the latest update and any significant alterations made to the wiring configurations․
Using an outdated diagram can lead to incorrect and potentially dangerous wiring․ Prioritize diagrams with the most recent revision number to ensure compliance and safety․ Verify the diagram corresponds to the specific switch model you are installing․

Common Mistakes to Avoid
When using a Clipsal single light switch wiring diagram PDF, avoid loose connections, incorrect color coding, and neglecting crucial safety precautions during installation․
Loose Wire Connections
A frequent issue when referencing a Clipsal single light switch wiring diagram PDF is encountering loose wire connections․ These can manifest as intermittent operation or complete failure of the switch․ Ensure all wires are securely fastened within the terminal blocks, utilizing the correct screwdriver size to avoid stripping the screw heads․
Regularly check connections, especially after initial installation and any subsequent maintenance․ Vibration or physical disturbance can loosen wires over time․ A voltage tester should confirm a secure connection before energizing the circuit, preventing potential hazards like arcing or overheating, as detailed in safety sections of the PDF․
Incorrect Wire Color Coding
Referring to a Clipsal single light switch wiring diagram PDF highlights the critical importance of correct wire color coding․ Australian standards dictate specific colors for live (brown), neutral (blue), and earth (green/yellow)․ Misinterpreting these colors, even slightly, can create dangerous situations, including electric shock or fire hazards․
Always double-check the diagram and existing wiring before making any connections․ If unsure, consult a qualified electrician․ The PDF often emphasizes color-coding for safety, and deviating from it voids warranties and compromises electrical integrity․ Incorrect wiring can also damage connected appliances․
Ignoring Safety Precautions
A Clipsal single light switch wiring diagram PDF invariably includes crucial safety warnings․ Ignoring these – such as switching off the circuit breaker before commencing work – is extremely dangerous․ Always verify the power is off with a voltage tester before touching any wires․
The PDF often stresses the need for insulated tools and appropriate personal protective equipment․ Failure to adhere to these precautions can result in severe electric shock, burns, or even fatal injuries․ Qualified electricians prioritize safety; emulate their practices․